no right click

Monday, December 24, 2012

Christmas Craziness!

Hello people!  I just wanted to do a quick post today since I haven't blogged in FOREVER!!  I've been so busy with the holiday season that I've had little to no time to scrap.  : (  I have, however, been busy making some homemade Christmas gifts!  I found three great ideas on Pinterest, of course, and have had fun making them!  I'm still fairly new to the whole blogging thing and am hoping it's ok for me to link to the sites where I found the ideas.

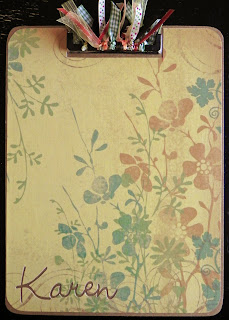
The first thing I've made is personalized clipboards.  They're so easy and so cute!  I followed the directions found on "The Frugal Girls" website.  Here is a link to this project Clipboard Project.  I followed the directions on that site pretty much to a T.  I did, however, decide to use my new Silhouette Cameo to cut out the names instead of using paper or ink.  I think the result is pretty nice! The one pictured here is for my Mom.  She's not on the internet very often so I think I'm safe in posting a pic before Christmas!: )


The second thing I've made is Cranberry-Lime Vodka!  I found this little goodie from Erinn Trebaczkiewicz's blog, "Fancy Napkin."  Here is a link to this project Vodka Project.  I was able to find some locally grown, fresh cranberries, which is a pretty good score considering it's December.  I used some great ice wine bottles that I found at a local u-brew shop for a dollar each!  I basically followed the directions outlined in the above link, with the exception of using fewer cranberries....so that I could add more vodka! ; )  I think the bottles look so pretty and make a great gift!


Lastly, I made some glass magnets! This idea was also found on "The Frugal Girls" website. There's some great ideas over there for sure. You should check it out!  Here is a link to this particular project Magnet Project.  I followed the instructions with the exception of not using a hot glue gun. I would've used one if I had one. I decided to use 3-in-1 craft glue and it seemed to make a really good bond.

My hubby is a really big squash fan (the sport...not the root veggie) ; ) so I decided to make some squash ball magnets for him and his squash buddies. I just used black and yellow cardstock and punched two holes in the black cardstock.  Then I glued the yellow cardstock behind the black cardstock.  I applied the mod podge and topped with the glass marble.  Once the mod podge was dry...about 30 minutes...I glued the magnet to the back.  I think they turned out pretty good!


So that's some of the things that have been keeping me busy since my last post. I'm hoping to make more scrappy time for myself in the new year! Merry Christmas and happy new year!! : )
Friday, November 9, 2012

Epicure's Slow Cooker Country Chicken

I recently had an Epicure party and got a bunch of new stuff to try out.  The Slow Cooker Country Chicken is from their "What's For Dinner?" line.  It's basically a seasoning pouch that you add to your slow cooker to make chicken stew.  This isn't really a recipe because it's just a seasoning package but I thought I'd tell you how it was.  I found it to be a really good, easy, quick, healthy family meal.

When I opened the package it smelled like Thanksgiving dinner!  Mmm...so yummy!  I mixed it up pretty much according to the package instructions...minus the peas.  The instructions called for chicken thighs but I used cut up chicken breasts instead.


I used some fresh baby potatoes, celery, and carrots.  The seasoning gets mixed with water and then poured over the chicken and veggies in the crokpot.  Easy peasy!  I cooked it on high for 4 hours.  I added a little extra water after about 3 hours and the sauce was still nice and thick at the end.


My little kitchen helper, Sally, is always around when I'm chopping up veggies.  She just loves them!


The meal was really quite good.  My four year old son loved it!  He was making mmm mmm sounds and fist pumping into the air.  I think that means it's good!  ha ha!


I'd like to add that I don't sell Epicure, I just enjoy their products and thought I would share a good thing!

Monday, October 22, 2012

Scrapping with Studio Calico!

I subscribed to Studio Calico this month and was very excited to get my first kit, Roller Rink!  I was very happy with the assortment of papers and embellishments!  I love the selection of papers that came with this kit.  They all work so nicely together.  Some of the papers are ones that I might not have chosen for myself on their own, but combined with the other papers in the kit, they are fantastic and a great compliment to my scrapbooking.

So far I have created two layouts with my kit.  The first one, title Hipsta, is one of my favourites!  I started by using a paint technique that I learned on You Tube.  I painted a piece of bubble wrap with acrylic paint and then pressed it on to my background paper.  I love the effect!  Then I layered some patterned paper with my photos.  For the title, I used wood grain thickers, but it was lacking on its own so I cut up some patterned paper and layered it with washi tape to be the background.


I stamped the date with Amy Tangerine's blue ready set go roller stamp.  I tested the stamp about 10 times on scrap paper and of course when I went to stamp it on my page I got a crappy impression!  I was so mad.  I had to fill it in with a black pen and then dabbed it with some white chalk ink to give it more of a stamped look.


I punched out a couple of buttons with a Martha Stewart punch and tied them with some twine.  I finished the layout off with a few enamel dots from My Minds Eye and a mistable camera from Studio Calico!


My second layout I titled Laugh.  This is the first layout I have done of my second son, so it is very special to me.  This layout was made using the main kit plus three add ons (crack the whip, toe stop, rainbow kneesocks).  Most of the papers used in the layout are the ones I mentioned earlier, that I probably wouldn't have picked out myself, but I'm so glad that I got them.  They go so nicely together and give this layout of my son a nice gentle effect.  I even managed to use flowers on the page without it being too girly!


I just love those little wooden clothes pegs from Pebbles!  They are so cute!  I added that little fox by Imaginisce to add some childhood whimsy to the page.

I just love those tiny little vellum envelopes from American Crafts.  They look so nice on a page.  I added the number one embellishment, because this is the first layout of my son, Austin.  The sentiment sticker seemed so fitting for this photo of him "Watch with glittering eyes the whole world around you".


I love, love, love the Amy Tangerine "weekender" thickers in Mediterranean colour.  They look like coloured scrabble pieces.  So awesome!


Thanks for looking and happy scrapping!! : )

Thursday, October 18, 2012

Birthday Goody Bags!

My son will be turning four this month and we are having his party on Sunday.  He LOVES Lightning McQueen so of course...that is the theme for his party!  This will be the first year that we are having his party out of house.  I'm kind of liking this idea because it's way less work for Mom...yay! : )

I decided to make the goody bags myself from scratch.  I used plain brown paper bags, ink, embossing powder, ribbon and tags.

I stamped the bags with a checkered pattern and embossed with white powder.  Then I decided to paint over the embossed image with inky black Mr. Huey's!  I wiped off the excess black paint and was left with the black and white image seen in the photos.  I added the little red car stamp from Amy Tangerine's "ready set go" collection.  I used a red embossing marker on this one and then embossed with clear powder.  I found that I didn't get a very good impression with the marker but that's all I had for red...so it will have to do!


To finish off the bag I cut out some red tag shapes with my Sizzix Big Kick and embossed "thank you" on them.  I used black ink and clear embossing powder.  I folded the bag down and put two holes in it with my crop-a-dile and threaded some checkered ribbon through the two holes and the tag.  Voila!  I think they look super cute and make the perfect goody bag for any car themed party!!

Sunday, October 14, 2012

My Inaugural Blog!

So I decided to start a blog!  I've been interested in starting a blog for a little while now and have taken the plunge!  (Scary Stuff - This is really out of my comfort zone ) My main focus will be on documenting my scrapbooking/crafting projects but I will also blog about new and/or favourite recipes and my busy life of being a Mom to two young boys!  I am looking forward to starting this process and hope you enjoy reading my posts.